A-Stack Functional and Automation Test Environment
A. Robot Framework installation instruction:
- Install Python and Pip
- Navigate to org and click Downloads
- Decide which Python version to use and download it
- Version 2.7.x: guaranteed to work with all RF libraries
- Version 3.6.x: some RF libraries might not work yet
- Python 2 support will stop in 2020… so Python 3 is recommended
- Run the Python installation as administrator
- Select the PATH & Pip options
- Verify python directories exist
- Verify python directories are in PATH
- Open command line and type python -V
- Also type pip -V
- Type pip list and follow pip upgrade directions
- Install Robot Framework & Selenium Library
- Open cmd
- Type pip install robotframework
- Hit enter
- Type pip install robotframework-seleniumlibrary
- Hit enter
- Install Desire browsers
- Which browsers & version to test?
- Google “browser usasage statistics”
- Examine company’s internal statistics
- Windows: Chrome, IE, Firefox
- Safary should be in proper context (Mac)
- Install from each respective browser site
- Check out browser/ OS cloud:
- SauceLabs.com (see Platforms)
- BrowserStack.com
- Install Selenium WebDrivers
- Robot Framework S2L sits on top of Selenium
- Selenium is a library package as .exe binary
- Each installed browser need its own Webdriver
- Edge, IE, Chrome, and Firefox installation process
- Create c:\bin
- Add c:\bin to PATH
- Which browsers & version to test?
- Go to seleniumhq.org and click “Download”
- Then find “IE Driver” & “Third party drivers” sections
- Download & extract each driver into c:\bin
- Note: Get the 32bit Webdriver for IE
- Install Pycharm IDE & Plugin
- Go to jetbrains.com
- Click Tools > Pycharm
- Download & install community edition (free)
- Install Pycharm
- Launch Pycharm
- Open File > Settings dialog
- Click on Plugins
- Search for & install Intellibot (patched for SeleniumLibrary)
- Restart Pycharm
- Create Base Scripts Directory and Project
- Create Base Directory (Eg: c:\development\robot-scripts}
- Each Robot Framework project will have its own directory
- C:\development\robot-scripts\project1
- C:\development\robot-scripts\project2
- Open Pycharm and create new Project in base directory
- Organize Your Project Files
- /ProjectBase
- /Tests
- Product1
- robot
- robot
- /Resources
- robot (Suite Setup, Open Browser, etc)
- /product-1
- robot
- robot
- Page-objects
- Po1.robot
- Po2.robot
- Product1
- /Tests
- /ProjectBase
- /Libraries
- /Results
- Product-1
B. Implementation test case:
In case example, we will test HelloTQL application:
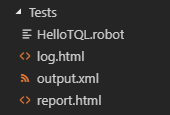
- Create folder and file with structure:
- Open HelloTQL.robot, and write test cases. Reffer all instruction document at https://robotframework.org/#documentation . Or we can reffer a simple successfull test case in https://bitbucket.org/MQTeam/assetintelligence/src/web/WEB/test_api/
- In Tests folder, open terminal and run: robot HelloTQL.robot
- After testing finished, open report.html in web browser to review the result.
, multiple selections available,
